Showing posts with label China Glaze Spontaneous. Show all posts

Sunday, 12 July 2015

NOTD: Summer Gradient


After my last mani I thought I should go back to something a bit more colourful. I love these colours together :)


I first applied a base coat. Then as I always do when I do a gradient I painted 1 coat of China Glaze White On White on all nails.


For the gradient I used a simple triangle makeup sponge and painted on Sally Hansen Insta-Dri Man-go Team!, Barry M Grapefruit and China Glaze Spontaneous. I then dabbed the sponge on my nails. To avoid having to do too much clean up I applied liquid latex around my nails.


For the stamping I used MoYou Black stamping polish and stamped part of the pattern from MoYou Explore Collection plate 22. I did this on my thumb, middle and ring finger.


I then used tape on my index and little finger to create a triangle going from the tip of my nail towards the cuticle. I painted over this with China Glaze Liquid Leather, then carefully peeled off the tape.


To finish it off I painted a top coat of Seche Vite!


As always thank you for visiting and if you have any questions or anything to say then please comment below :)
To follow me on other sites simply click any of the buttons below to head to my page.


Friday, 6 March 2015

Smoosh Attack!


The weekly challenge on the Nail Polish Queens Google+ page is to use a technique called Smoosh Attack. I will show how this is done below :)
(I added the stamping a few days after I initially did this mani)


I applied my base coat as usual. Then I painted just one coat of Barry M Coconut on all nails.


To create the Smoosh I used several polishes and dabbed them randomly on my stamper, I then took another stamper and pressed them together. The marble effect that created on the second stamper was then placed onto my nail in the same way as stamping normally. The colours I used were Barry M Coconut and Guava, China Glaze Spontaneous and Ciate Electronica.


I applied a top coat of Seche Vite and that is the mani finished :)


However a few days later I added the stamping, I will show what I did below...


I removed everything from my index and little finger and painted instead 3 coats of Barry M Socialite.
Over the smoosh technique on the other nail I painted a coat of Sally Hansen Hidden Treasure.


On the smoosh nails I then stamped this area of pattern from MoYou Fashionista Collection plate 11 using MoYou black stamping polish.


I applied a top coat of Seche Vite and now that is the mani completely finished!


As always thank you for visiting and if you have any questions or anything to say then please comment below :)


Thursday, 30 October 2014

Halloween: Spooky Branches


I wanted to do a Halloween mani that wasn't the usual skulls, ghosts and spiders and that was a bit more pretty looking. So here it is :)


To start I applied a base coat. Then on my thumb and ring finger I painted 3 coats of Barry M Fashion Icon (this is from the new Glitterati collection, all of which I bought the other day!). On my index, middle and little finger I painted 1 coat of China Glaze White on White, I only painted 1 coat as I will be doing a gradient over it.


For the gradient I used W7 Black and China Glaze Grape Pop and Spontaneous. I applied this with a small make-up sponge and then cleaned up around the edges using a cotton bud dipped on nail polish remover.


For the stamping I used MoYou Mother Nature Collection 01 and Konad Black. The tree on the stamping plate looks quite spooky to me, so I decided to stamp the branches from it.


To finish I applied a top coat of Seche Vite. On the stamped nails I was going to paint over China Glaze Matte Magic, but it has gone really gloopy :( so will need to get another one!


Also I thought I would share a couple of my recent purchases!


This is the Barry M Glitterati Collection, one of which I used in this mani. I saw them and just had to get them! I got them from Superdrug who at the moment have an offer of 3 for 2 on all cosmetics :)


And just before I started on this mani this came in the post, great timing Mr Postman! It is a Swarovski crystal glass nail file from Mont Bleu. I had never used a glass nail file before and this one is just amazing to use, and sooo pretty!


As always thank you for visiting and if you have any questions or anything to say then please comment below :)


Sunday, 15 June 2014

31 Day Challenge 2014: Day 14 - Flowers


Love the stamping used for this mani, bought the plate partly for this pattern. Quite a simple one this time after my last mani lol!


I first applied a base coat as always. Then I painted 2 coats of China Glaze's Spontaneous.


After that was dry I applied 1 coat of Max Factor's Fantasy Fire. I have had this for ages and hadn't got round to using it yet, so it's about time!


I then stamped using Konad's black and these two patterns from MoYou plate 04 of the Pro Collection. The left of the two pattern where the flowers are not filled in I stamped on my middle and ring finger. The right pattern where the flowers are filled in I stamped on my thumb, index and ring finger.


I then waited a little and applied a top coat of Seche Vite to finish.

Love this mani, it is so simple but gives a great effect.


As always thank you for visiting and if you have any questions or anything to say then please comment below :)


Thursday, 6 June 2013

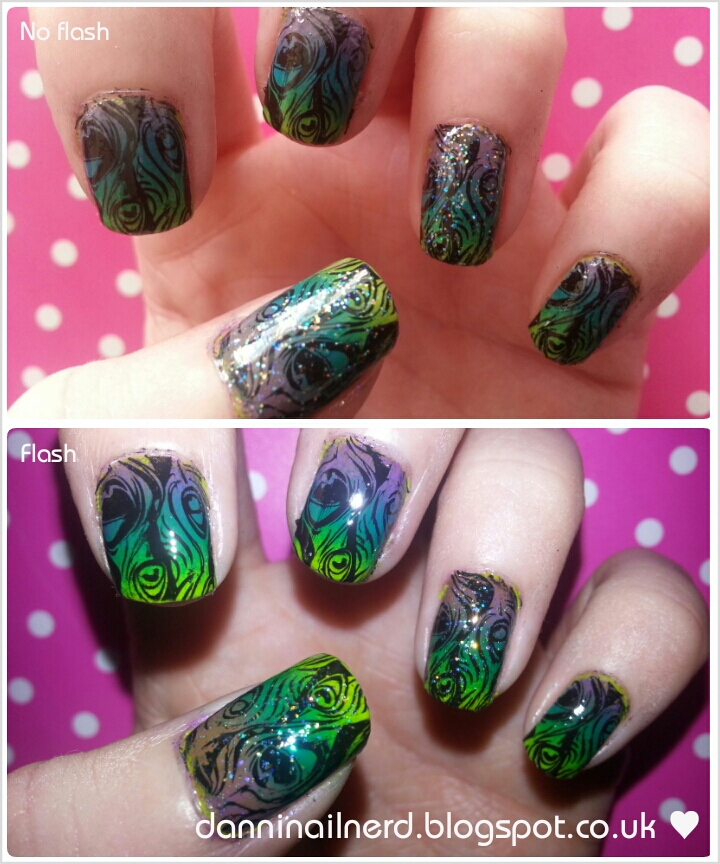
Peacock!!

A few weeks ago I received my Pueen Cosmetics stamping plates and ever since I got them I have wanted to used the peacock stamp. I haven't tested all of the images yet but as you can see the peacock image has stamped very well, and here is how I did this...

First I painted on my base coat as always! Then I applied 2 coats of China Glaze's Def Defying. This colour is very bright but it isn't quite neon bright so it is very nice :)

I then did a gradient on each nail, for this I again used China Glaze's Def Defying then also from China Glaze I used Hanging in the Balance (the blue) and Spontaneous (the purple). I thought these colours would be better for peacock but I was also contemplating using turquoise or pink as well. So next time I may substitute a colour and see how it turns out.

Then on every nail I used Konad's black special polish with Pueen plate Pueen09 and the amazing peacock pattern! I highly recommend purchasing this set of plates, I ordered them from pueencosmetics.com and with delivery on top to the UK this cost £19.49. Not too bad I say!

Then on the thumb and ring finger I applied a coat of Barry M's Pink Iridescent, this doesn't add any pink colouring. I also applied a top coat and then I was done :)
As you can see in the flash picture I should have stamped a bit more of the gradient colours on my thumb nail as there isn't enough of the purple, oops! But despite this I still really like this mani and you should try it!!

Hope you all like it too :)
Thank you for visiting!