Monday 17 June 2013

Zebra Pearl

I have been wanting to use my China Glaze Platinum Pearl polish for a while and thought it would look good for zebra print so here it is :)

First I applied my base coat then 2 coats of China Glaze's Platinum Pearl. This polish is so pretty, the pictures really don't do it justice it looks so much better in real life, definitely a nail polish I would recommend!

Once my nail polish had dried quite a bit I applied the zebra print from Konad plate M57 using Konad's black special polish. I say I let it dry quite a bit because of the next step of this mani...

I then used a piece of normal sticky tape, I made it a little less sticky just by pressing it on my top a couple times and then on my middle and ring finger I placed the tape diagonally along the nail. I then used Barry M's Black to paint the tip and removed the tape before it dried.
I then let this dry and used the smallest size dotting tool I have along with W7's Silver Dazzle and painted a line of this along the diagonal line I just created.

I applied my top coat and then I was done, very simple but think this looks so good and I am just in love with China Glaze's Platinum Pearl polish, as I said I definitely recommend it :)

Thanks for looking and if you have any questions or anything to say please comment below!


Thursday 13 June 2013

Snakeskin Shimmer

So as you can see from my previous post yesterday I got some lovely nail mail of some Sally Hansen Insta-Dri polishes. So I thought today I would use them for my new mani.

And below is how I did this... :)

First of course I applied my basecoat, I then applied 3 coats of Sally Hansen Insta-Dri Bronze Ablaze, yes I said 3! I was surprised that I needed so many because this colour stamps so well, but it took 3 coats for it to be completely opaque. I do thin coats though so maybe if I had done thicker coats 2 would have been enough.

I then used Pueen plate Pueen10 and the snakeskin pattern at the top. I love this pattern and near enough all of the patterns that come in this set of plates! The colours I used were both Insta-Dri polishes, I used Teal-y Fast and Ruby Rush. I applied both polishes quickly over the pattern and then quickly scraped and stamped them. I did the Teal-y Fast on the top of the nail and Ruby Rush on the bottom for the thumb, index and little finger. Then for the ring and middle finger I applied them the opposite way round.
The colours do stand out from Bronze Ablaze, but I think because all of the colours are shimmer colours I would probably use a non shimmer colour instead of Bronze Ablaze next time as they may stand out more.

And finally I applied the top coat :)

Hope you all like this and please comment if you have any questions or anything to say!


Wednesday 12 June 2013

Sally Hansen Insta-Dri Stamping Tests and Swatches

So I have been wanting to order some Sally Hansen Insta-Dri Polishes for a while now, and today I got nail mail with all of them coming at once!! So I have done swatches of them and tested them for stamping and I am very pleased with my purchase :)

So these are all the polishes I bought, a couple of them I bought when out shopping the other day from a little stall, then some of them I bought from www.cosmeticsbycandy.co.uk and the rest I bought from www.directcosmetics.com. They were very cheap from these sites, Cosmetics By Candy sell them for £1.99 each, and Direct Cosmetics sell most of them for £1.50 and a couple for £1.99. Bargain! :)
I will not name them now I will do that below with the swatches...

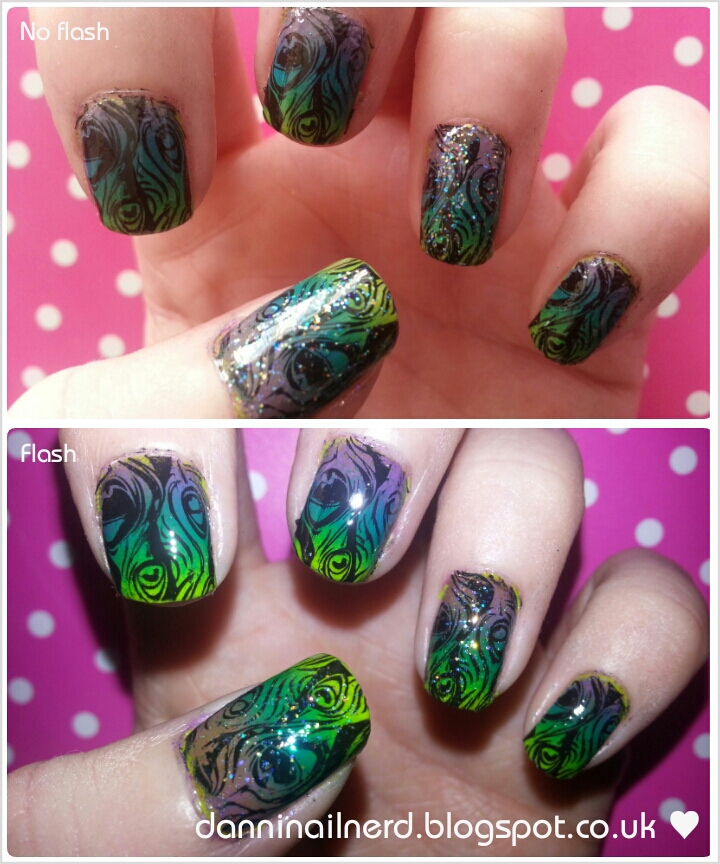
...First four from left to right are; Lightening, Jade Jump, Brisk Blue and Lively Lilac and as shown in the picture the top is with no flash and bottom is with flash.

Next four from left to right are; Presto Pink, Speedy Sunburst, Rapid Red and Emerald Express. All of these colours are really nice but I am definitely looking forward to using Emerald Express.

 From Emerald Express and onwards these are all shimmer colours. These four from left to right are; Jumpin' Jade (although the label on the bottle of this one has gone so I will have to memorise it lol), Teal-y Fast, Grape Escape and Ruby Rush.

And the last three from left to right are; Quick Brick, Bronze Ablaze and Coco a-go-go.

So now are the stamping swatches, I will name the polishes again from left to right. I apologise in advance for the really bad stamping in the next couple of pictures. I think this happened because I was too quick to pick up the image, waiting a few seconds before doing so stops it from smudging. I think I thought that because it is a quick drying polish that I would need to pick it up quickly.
Anyway from left to right are; Lightening, Jade Jump, Brisk Blue and Lively Lilac. These have all stamped really well on both the white and black, the blue has probably come out the best and I was suprised how well Jade Jump turned out.

From left to right are; Presto Pink, Speedy Sunburst, Rapid Red and Emerald Express. Presto Pink has definitely come out better on the black and white than the rest.
I have done this picture different because with the shimmer polishes I needed to get more of the flash directly on it to show how it looks on the black. With the shimmer polishes they show up better in direct light and in non-direct light not as well, however they all do stamp very well over the black.

From left to right are; Jumpin' Jade, Teal-y Fast, Grape Escape and Ruby Rush. Again these stamp well, I was surprised the shimmer polishes did stamp so well.

And the last three from left to right are; Quick Brick, Bronze Ablaze and Coco a-go-go. These three colours are probably my favourites for the stamping out of the shimmer colours, they show up so well on both the black and the white and are very pretty colours.

So that is all of the Insta-Dri polishes I have. I hope this has been helpful.

Thank you for looking at my blog


Thursday 6 June 2013

Peacock!!

A few weeks ago I received my Pueen Cosmetics stamping plates and ever since I got them I have wanted to used the peacock stamp. I haven't tested all of the images yet but as you can see the peacock image has stamped very well, and here is how I did this...

First I painted on my base coat as always! Then I applied 2 coats of China Glaze's Def Defying. This colour is very bright but it isn't quite neon bright so it is very nice :)

I then did a gradient on each nail, for this I again used China Glaze's Def Defying then also from China Glaze I used Hanging in the Balance (the blue) and Spontaneous (the purple). I thought these colours would be better for peacock but I was also contemplating using turquoise or pink as well. So next time I may substitute a colour and see how it turns out.

Then on every nail I used Konad's black special polish with Pueen plate Pueen09 and the amazing peacock pattern! I highly recommend purchasing this set of plates, I ordered them from pueencosmetics.com and with delivery on top to the UK this cost £19.49. Not too bad I say!

Then on the thumb and ring finger I applied a coat of Barry M's Pink Iridescent, this doesn't add any pink colouring. I also applied a top coat and then I was done :)
As you can see in the flash picture I should have stamped a bit more of the gradient colours on my thumb nail as there isn't enough of the purple, oops! But despite this I still really like this mani and you should try it!!

Hope you all like it too :)
Thank you for visiting!


Sunday 2 June 2013

Reciprocal Gradient!

I love gradient nails and then I saw these reciprocal gradient nails and just had to try it so here they are... :)

So first I applied my base coat of course, and then I applied just one coat of Avon's Pastel Pink. I know it would need another coat but because I am putting a few layers on top I decided not to do the second coat.

I then did my first gradient, I used again Avon's Pastel Pink, then I used Avon's Viva Pink and China Glaze's Heli-Yum.
Once I had let this completely dry I then applied striping tape in three lines along the nail (I forgot to take a picture of this lol duurrrhh!) but once this tape was on I then did the same colour gradient on top going in the opposite direction.

And once my top coat was applied this was the end result...
I don't normally wear much pink nail varnish, but because this isn't one solid pink colour I think it looks really good, love it!

Hope you all love it too
Thank you for looking :)