Showing posts with label Barry M Black. Show all posts

Tuesday, 29 October 2013

Spooky Waterfall


I wasn't getting much inspiration for a Halloween mani, but I used colours that I think look Halloween-ish to create this waterfall mani instead as it is the challenge for this week on the Nail Polish Queens Google+ community. If you love nail art then you should definitely join this community, everyone is really friendly and helpful and people are always posting great designs so you will get lots of inspiration! They now also have a blog too :)


I had this acrylic nail clipper delivered last week (from Amazon for £2.37) and used it to cut my nails, I think this has helped me get a nicer shape. I wanted my nails to be a bit more square but was having difficulty doing so and this has done it very well!


So to start this mani I applied my usual basecoat, I used Barry M Basecoat Topcoat and Nail Hardener. I then applied 2 coats of Barry M black. I have  had this a while and it is running low and is going gloopy, so I have ordered a black from W7 and will let you know what it is like when I get it.


On my thumb and ring finger I applied a coat of Sally Hansen Hidden Treasure (the original version not the new one!). This is amazing over any colour, but over black as I tried to show in the pictures it gives off orange and green in the flakes which is perfect for this mani.


On the thumb and ringer finger I also applied a black diamanté stud near the cuticle. Then for the waterfall effect on the other nails I used a thin nail art brush (this was from one of the cheap sets you can find on eBay and amazon). I put some of each nail polish in a dappen dish and used the brush to create various length lines that thin out at the end. To do this I dragged the brush to make the line and just lifted away near the end.
The colours used are all China Glaze and from left to right they are Sun Worshiper, Def Defying and Spontaneous. I think these colours go quite well for Halloween.


I then applied my topcoat and here is the finished mani :)
I think this all goes together very well and I love this waterfall technique! Was a lot easier to do that I thought it would be too.


As always if you have any questions or anything at all to say please comment below! Thank you for visiting :)


Saturday, 17 August 2013

Matte & Mirror


It has been a while since I used my matte top coat so here is my latest mani using it :)


First I applied my basecoat, I use Barry M basecoat, topcoat and nail hardener, I also use this as my topcoat. I then applied 2 coats of Barry M black. Quite pleased with how neat I managed to do this today :)


I then applied 1 coat of China Glaze Matte Magic. This topcoat gives a matte effect to any nail polish that it is painted over. I think I very much prefer black in matte than shiny, looks so good!


Once this had completely dried I then did some stamping :)
I first used Pueen plate Pueen13 and the very top pattern. I stamped this pattern on my middle and ring finger using KIKO 625 Emerald. I ordered a few of these mirror polishes from KIKO and as you can see they stamp really well, love them! Well worth buying them if you love to stamp.
I then used Konad black to stamp the french tips from Konad plate m19, I do this to get the nice clean line. I then painted over with Barry M black very carefully as just doing the stamping did not come out bold enough.


And this is the finished mani. I have done a similar mani to this before but I just think it is such an effective look and it looks a lot more difficult to do than it actually is :)


Thank you for visiting my post! I hope you like this step by step guide and if you have any questions or anything to say then please comment below.


Wednesday, 14 August 2013

New pretties with swatches!


So these are the lovely polishes I have had in the mail today, I have already done a mani using the Sally Hansen polish but I will do a separate post for that.


So first to show the different ways it can look I did one coat of Sally Hansen Hidden Treasure on 5 different colours. From left to right they are: MUA I <3 U, China Glaze Re-Fresh Mint, Sally Hansen Fairy Teal, China Glaze Spontaneous and Barry M Black.
I love how different this flakie top coat looks on each colour and I think this is definitely my new favourite polish, love it!
It is now discontinued and is very hard to find, I found this for about £12 on eBay but I bought the last one so can't post the listing.


KIKO had a sale and I loved the mirror polishes and thought they would be good for stamping! I also got one normal colour which is the first colour on the left, the colours from left to right are: 281 Mango, 617 Taupe, 627 Lime Green, 625 Emerald, 623 Blue, 621 Violet and 619 Red Peony.
These are really lovely colours and the mirror polishes were all painted on in one coat!


And now are the swatches for how they are with stamping.
On the left is 617 Taupe and the right is 627 Lime Green. As you can see they both stamp well on white and black and look completely opaque on both which is really good!


On the left is 625 Emerald and on the right is 623 Blue. Again as you can see they both stamp really opaque and of course are really pretty colours.


These last two are on the left 621 Violet and on the right 619 Red Peony. And again really opaque and really pretty.


All these colours are really nice and they are brilliant for stamping! I am so excited to use them and I am sure I will be buying some more!
I got these from the KIKO UK website www.kikocosmetics.co.uk, they currently have a sale but am not sure when this sale finishes.


Thank you for looking at my post and hope this was helpful for anyone looking for any new polishes to buy :)


Monday, 17 June 2013

Zebra Pearl

I have been wanting to use my China Glaze Platinum Pearl polish for a while and thought it would look good for zebra print so here it is :)

First I applied my base coat then 2 coats of China Glaze's Platinum Pearl. This polish is so pretty, the pictures really don't do it justice it looks so much better in real life, definitely a nail polish I would recommend!

Once my nail polish had dried quite a bit I applied the zebra print from Konad plate M57 using Konad's black special polish. I say I let it dry quite a bit because of the next step of this mani...

I then used a piece of normal sticky tape, I made it a little less sticky just by pressing it on my top a couple times and then on my middle and ring finger I placed the tape diagonally along the nail. I then used Barry M's Black to paint the tip and removed the tape before it dried.
I then let this dry and used the smallest size dotting tool I have along with W7's Silver Dazzle and painted a line of this along the diagonal line I just created.

I applied my top coat and then I was done, very simple but think this looks so good and I am just in love with China Glaze's Platinum Pearl polish, as I said I definitely recommend it :)

Thanks for looking and if you have any questions or anything to say please comment below!


Sunday, 26 May 2013

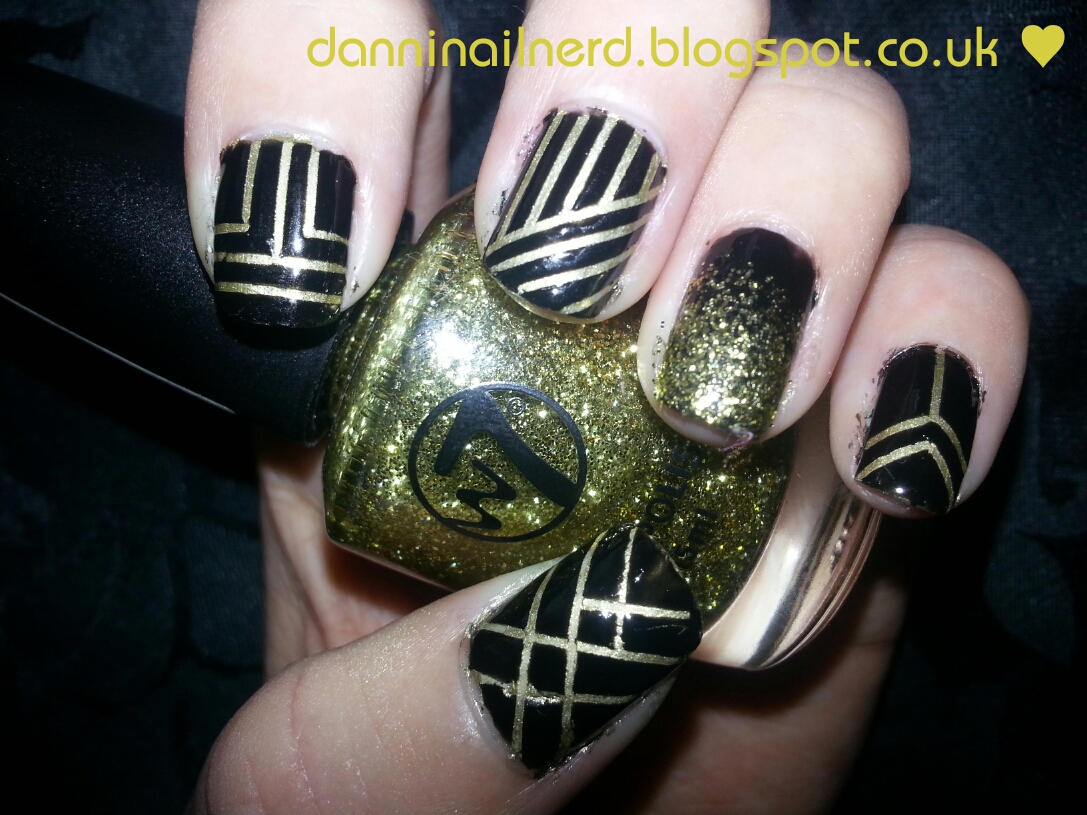
The Great Gatsby inspired nails!

I have seen a lot of Great Gatsby mani's online in the past few weeks and they look so amazing! So I thought I would do my own one. This is my first ever time using striping tape so I will do a lot better next time, but I think they are quite good considering :)

First I applied my base coat and then I applied 2 coats of Barry M's gold foil to each nail and 2 coats of Barry M's black to my ring finger.

Then on my ring finger I did a gradient effect using W7's gold dazzle, I used this glitter gradient effect a couple of mani's ago and I really love it, it is so easy to do but looks so pretty :)

I then used a white striping tape to make different art deco looking patterns on each nail, apart from on my ring finger. I bought these from eBay (here) I got a mixed pack of 10 for £2.88, but you can also buy 3, 5, 20 or 30. I picked 10 because they had 10 different colours and I asked for 1 of each colour which I did receive.

After I had applied all the striping tape I used Barry M's black and painted over a nail then before moving onto the next nail I used tweezers to peel off the tape before the nail polish dried. Then of course applied a top coat once this was dry.
I am very happy with how they came out, I did mess up my thumb nail a bit on this hand which I was a bit disappointed with, but apart from that I love them!

Hope you all do too, see you for my next post!