Showing posts with label Gold. Show all posts

Thursday, 22 January 2015

Heart Of Gold


Pretty random mani, wasn't really in the mood but my previous mani was a little chipped.


I firstly painted my base coat. Then on my thumb, middle and ring finger I painted 3 coats of A England Holy Grail (Limited Edition). On my index and little finger I painted 2 coats of China Glaze Liquid Leather.


On my thumb and ring finger I stamped this polka dot pattern from Cheeky plate CH6 using Konad Black.


On my middle finger I used a heart shaped corner cutter to cut a heart shape in some vinyl tape. I then stuck this on my nail, painted with China Glaze Liquid Leather and peeled off the vinyl tape.


I painted a coat of Seche Vite on each nail and that is the mani finished.


As always thank you for visiting and if you have any questions or anything to say then please comment below :)


Sunday, 26 May 2013

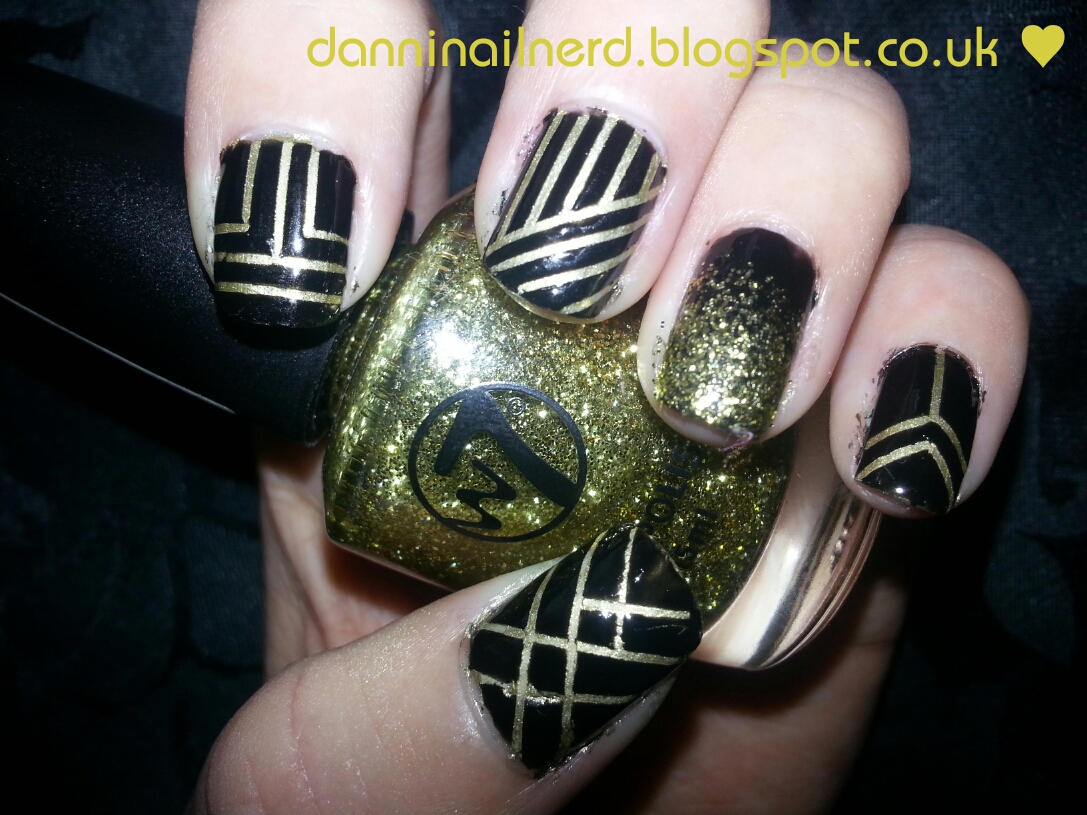
The Great Gatsby inspired nails!

I have seen a lot of Great Gatsby mani's online in the past few weeks and they look so amazing! So I thought I would do my own one. This is my first ever time using striping tape so I will do a lot better next time, but I think they are quite good considering :)

First I applied my base coat and then I applied 2 coats of Barry M's gold foil to each nail and 2 coats of Barry M's black to my ring finger.

Then on my ring finger I did a gradient effect using W7's gold dazzle, I used this glitter gradient effect a couple of mani's ago and I really love it, it is so easy to do but looks so pretty :)

I then used a white striping tape to make different art deco looking patterns on each nail, apart from on my ring finger. I bought these from eBay (here) I got a mixed pack of 10 for £2.88, but you can also buy 3, 5, 20 or 30. I picked 10 because they had 10 different colours and I asked for 1 of each colour which I did receive.

After I had applied all the striping tape I used Barry M's black and painted over a nail then before moving onto the next nail I used tweezers to peel off the tape before the nail polish dried. Then of course applied a top coat once this was dry.
I am very happy with how they came out, I did mess up my thumb nail a bit on this hand which I was a bit disappointed with, but apart from that I love them!

Hope you all do too, see you for my next post!


Tuesday, 16 April 2013

Pink & Gold, Dots & Hearts :)

I like manicures where each nail has a different design on it, but because of the colours matching together it looks really good together so I thought I would do one. although there are 2 nails that are the same!

So I started off by applying my base coat, I use Barry M's All in one Basecoat, Topcoat and Nail Hardener. I then applied Barry M's Pink Flamingo to my thumb, middle and little finger, and applied Barry M's Matt White to my index and ring finger (next time I don't think I will need to apply the white, I was going to do something different to what I ended up doing).

On my thumb I used Konad's white polish and I used this really nice heart design on the Bundle Monster plate BM-317 (this is from the latest 2012 Bundle Monster collection). I smudged the design a bit when I put my top coat on :(

For my little finger I then used again Konad's white polish and this time used a copy of a Konad plate which I ordered from here (last time I posted this link the plates cost £1.35 each, but they now cost £1.41 each). I used the nice heart and lines pattern and then where the 2 sparkles are in the pattern I used a dotting tool to place some of W7's gold dazzle polish.

For my middle finger I used the same Konad white polish and used Cheeky plate CH6 (this is from their Vibrant collection). Then on my index and ring finger where the white polish was I applied 2 coats of W7's gold dazzle. As you can see the white polish is not visible, at 1st I was going to do 1 coat of the gold dazzle so you could still see the white polish, but the gold glitter looked so nice that I didn't do this. So next time I would simply just apply my base coat without applying any white polish first.

And here is the finished manicure with my China Glaze fast forward topcoat, I really like this one and I hope you do too :)

If you have anything to say or any questions please comment below.

See you for my next post!!